
What is a Loop?
When we need to perform certain tasks or operations that are repetitive in nature, or where there is a need to run the same kind of command over and over, we use loops. Loops, in Stata, allow us to run a command (or a set of commands) as many times as we want based on a range of variables, strings, numbers or iterations that we specify. The idea of loop is discussed in detail in Chapter 10 of Data Management Using Stata by Michael N. Mitchell.
Let’s suppose you want to run separate regressions of stock returns on index returns for eight company stocks in your data set.
reg stock_ri index_ri if firm==1 reg stock_ri index_ri if firm==2 reg stock_ri index_ri if firm==3 reg stock_ri index_ri if firm==4 reg stock_ri index_ri if firm==5 reg stock_ri index_ri if firm==6 reg stock_ri index_ri if firm==7 reg stock_ri index_ri if firm==8
Don’t worry if you are not familiar with the regression command reg. The important thing to note here is that we are running the exact same commands each time with the only difference being the number specified as part of the if condition (the number is a code for each company stock). Eight commands still seem like a doable task, but what if you had hundreds of companies to run these regressions for?
A loop can significantly reduce the number of commands you would have to type. Using a for loop, we can do the exact eight regressions above in the following manner:
forvalues i=1/8{ reg stock_ri index_ri if firm==`i' }What are the different types of loops in Stata?
There are three kinds of loops in Stata:
- forvalues
- foreach
- while
forvalues Loop in Stata
A forvalues loop is used for looping over numerical values. We used this loop in our example above to run the loop 8 times. The way it works is by assigning the range of numerical values to a local variable. Here the local variable `i' was assigned a range of numerical values of 1 to 8 (the syntax for this is 1/8). This variable was also written as a placeholder of sorts for the numbers in our regression command.
The general syntax for a forvalue loop is as follows:
forvalues lname = range{ Stata command referring to `lname' }We start by the loop name followed by the range of values that we want the loop to go over. An open curly bracket is also typed in this same line to open the loop. In the next line, we write the commands that we want to run. To close the loop, i.e. to tell Stata that it should stop looping over commands, we close it with closed curly brackets in a separate line.
Here, lname refers to the name of any local variable that will be used as a reference for our desired range in the commands. In our example above, we named it `i'. When you are referring to a local name in the loop, enclose it in a backtick/backquote (`) (which is typically situated under the Escape key) and an apostrophe (’).
The range will be written with the starting value, a backslash, and the ending value, e.g. 1/10 if you would like lname to start from 1 and run the loop until it reaches 10. In such a case, the lname increases by 1 each time the loop is run.
Note that the help section underlines the first four letters of the forvalues command. This means that we can abbreviate/shorten the command up until these four letters.
Example 1 – Displaying Numeric Values
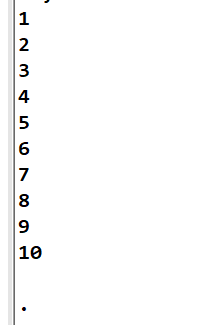
forvalues i=1/10 { display `i’ }The loop above simply displays the value held by the local variable `i' each time the loop is run. The output would simply be a list of numbers from 1 to 10 since these are the values `i' takes on after each iteration of the loop.
If you would like for it to increase by another (constant) value, you can specify the difference within brackets between the starting and ending value. For example, 1(5)20. The loop will start with lname being equal to 1, and then increase it by 5 for each iteration until lname reaches 20.
The local loop cannot loop backwards for a number range. That is to say, if you were to start the loop with
forvalues i=10/1 {
…the variable `i' will not start with the value 10 and descend to 1. This application is discussed in Example 4.
Example 2 – Summarising a Variable for Different Years
In this example, we want to output summary statistics for a variable called ‘market_return’ but we want these summary tables to be created separately for different years. Instead of writing separate commands for the fourteen years in our data (2001 till 2014), we just specify their range in the loop and let Stata run the summ for all of these years.
forvalue i=2001/2014 { summ market_return if year==`i’ }Stata will now run this loop by iterating the local variable `i' starting from 2001 up until it reaches 2014. This gives us fourteen summary statistics tables for each of these years.
Example 3 – Incrementing Values by a Specific Value
When you don’t specify it, Stata only increments the local variable’s value by 1 each time the loop is run. What if you want it to increment by another value? To do that, we simply add this value in between the starting and finishing value by enclosing it inside a pair of brackets.
forvalues i=1(2)10 { display `i’ }Now, this command will start with local ‘i’’s value being equal to 1, and display ‘1’ as the output, followed by the next iteration. This iteration will increase the value of ‘i’ by 2 and display 3. The complete output of this command will be the numbers: 1, 3, 5, 7, 9. Of course it won’t go beyond 9, because iterating 9 with 2 would be beyond the range of this loop which ends at 10.
Example 4 – Looping Over Values Backwards/in Descending Order
If you want to display each of the values from 10 to 1 in descending order, specify the range as 10/1 while also adding a negative increment value in your loop.
forvalues i=10(-1)1 { display `i’ }This will display an output of 10, 9, 8, …, 1.
Example 5 – Incrementing Based on a Difference of Two Numbers
If you would like to increment your local variable values based on a difference of two numbers, while also displaying those two numbers, the following syntax may be used:
forvalues i=1 3 to 10 { display `i’ }Firstly, this loop will output the first two values that ‘i’ takes i.e. 1 and 3. Then, it will increment the value of ‘i’ using the difference of these two numbers. Since the difference of 1 and 3 is 2, the loop will increment the values of ‘i’ by 2.
The output, therefore, will be a display of numbers 1, 3, 5, 7 and 9.
Another example of this is:
forvalues i=1 5 to 10 { display `i’ }Here, Stata will output the numbers 1 and 5, and then increment ‘i’ by a difference of these two numbers (5-1=4) and display 9.
The exact same functionality can also be achieved using a slightly different syntax:
forvalues i=1 5:10 { display `i’ }Related Article: Stata Command Modifiers if, in, by, bysort Qualifiers and Statements in Stata
Example 6 – Generating Random Numbers
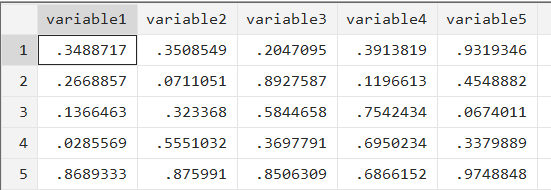
You can generate new variables and populate their observations with a list of random numbers using the forvalues loop with the runiform() command. Let’s assume we have 5 observations where we want a random number generated for 5 new variables.
set obs 5
This command sets the number of observations to 5. You don’t have to run it if you already have observations in your data.
forvalue i=1/5 { gen variable`i’ = runiform() }This loop generates 5 variables called ‘variable1’, ‘variable2’, ‘variable3’, ‘variable4’, and ‘variable5’. Each of these variables is populated with random numbers for all observations in the dataset.
Example 7 – Looping Over Negative Numbers
Let’s suppose we want to start with the value of -5 and end with -10. We can specify this range along with a negative increment value.
forvalues i=-5(-1)-10 { display `i’ }This loop will first display -5 and then increment it backwards by 1 to show -6, up until it reaches -10.
Example 8 -Squaring Negative Numbers
We now want to display the squares of negative numbers. To do that let’s add ^2 to or display command.
forvalues i=-5(-1)-10 { display `i’^2 }This loop will square the number but keeps the negative sign. i.e. it gives an output of -25, -36, …, -100.
To get around this problem, enclose the local variable ‘i’ (which refers to the numbers that need to be squared) in brackets.
forvalues i=-5(-1)-10 { display (`i’)^2 }This will output the correct results of 25, 36, …, 100.
foreach Loop in Stata
A foreach loop can be used to go over numerical values, but also strings, lists and variable names making it more powerful than a forvalues loop. The general syntax for this loop looks something like:
foreach lname { in | of listtype } list { commands referring to ‘lname’ }For example:
foreach i of num 1/10{ display `i’ }num tells Stata that the values to be held by the local variable will be numbers. numlist will tell what the range of numbers is.
This loop will also return a list of numbers from 1 to 10 as the output.
Note that you can use any name for the local variable.
This syntax is similar to the forvalues loop, with the difference being the addition of the terms { in | of listtype } list. The curly brackets here indicate that these are optional parts of the command. The vertical line between ‘in’ and ‘of’ means it is necessary to specify one of these. The list can be a local, global, variable list (varlist), a new variable list (newvarlist), or a number list (numlist).
You can also understand the syntax of the loop using the help command in Stata.
help foreach
Example 1 – Displaying Strings
We will use the following syntax for this example:
foreach lname in any list {Let’s suppose you have a list of names of people and you would like to display them.
foreach name in “John” “Ali” “Shah”{ display “`name’” }The local name we chose here is ‘name’ – you can name it however you wish. Secondly, note that since we are working with strings here, they are enclosed in quotation marks both when we are listing them before the loop and when we are referring to them through the local name inside the loop. You will continue to refer to the local by writing it within ` and ‘, but this time, because the local contains a string, we also add the quotation marks around it.
Example 2 – Running Various Regressions for Different Covariates
In this example, we want to run three univariate regressions of an outcome variable ‘y’ on three independent variables, ‘x1’, ‘x2’, and ‘x3’ separately.
foreach name in “x1” “x2” “x3” { reg y `name’ }This may be easy enough to do without a loop, but if your regressions were to have more variables, conditions, or time variables, a loop would make the task much quicker.
Example 3 – Running Multiple Commands for a Set of Variables
We can also run multiple commands for various variables using a loop instead of typing and running several commands. In the previous two examples, we named our local as ‘name’. This time, let’s call it ‘command’ because it will help us to run the loop for different commands instead of different variable names.
foreach command in “summ” “corr” “reg” { `command’ y x1 x2 x3 }Here the loop will first run the summ command, then the corr command, and finally the reg command. Such an approach to running multiple commands can come in handy when you want to run several summary commands and regressions and store and output their tables to a file, for example.
Example 4 – Looping Over All Unique Values of a Variable
Now let’s suppose we want to run the same three regressions as before but separately for each of the three years stored in the variable ‘year’ (2019, 2020, 2021). To make Stata loop over these year values, we can use the levelsof command. This command is able to provide a list of unique values for a variable. Here, it is easy enough to write the three year values on our own, but some datasets might have year data for decades, and/or months. In such cases, it is very time consuming to write the list of all the years or months. We can let Stata get the unique values within a variable using the levelsof command.
Furthermore, it is also possible to store this list of unique values in a local variable through a simple option called local() where the brackets hold the name of the local that you want to store the list in.
levelsof year, local(yearlist)
The command above will take all the unique values in the ‘year’ variable (2019, 2020, 2021), and store them in a sorted order in the local variable that we have decided to call ‘yearlist’. We can now use this local variable in a loop to refer to each year one by one.
levelsof year, local(yearlist) foreach x in `yearlist’ { reg y x1 x2 x 3 if year==`x’ }For the loop command, the list stored by the local ‘yearlist’ is referred to by ‘x’. So, the first time this loop is run, ‘x’ will take the value 2019, and run the regression for this year. It will then loop back and run the regression again for the next year in the list, 2020, followed by 2021.
One way to improve the command above is by displaying the year before the regression command. Running the loop above will only output the regression tables with no indication of the year that they are for. We can add the display command as follows.
levelsof year, local(yearlist) foreach x in `yearlist’ { display “`x’” reg y x1 x2 x 3 if year==`x’ }You can use the levelsof command in the same manner for any categorical variable where each one of the categories need to be separately referred to in a command.
Example 5 – Looping Over a Variable List
In this example, let’s use the loop to iterate and go over a variable list using the varlist syntax.
foreach var of varlist x1 x2 x3 { reg y `var’ }This is will give us the same output as the one in Example 2. However, when referring to a variable list, it is more appropriate to use the varlist syntax rather than the one we used in the former example. We won’t have to treat the variable names as a string here. This also allows us to refer to the variable list in a concise manner like a range. For example, ‘x1’, ‘x2’, and ‘x3’ appear in order in our variable list, so we can just write x1-x3 in the command. If you had more variables that went up to, say, ‘x10’, typing x1-x10 would save unnecessarily long commands. Do note that the variables you want to use in each iteration of the loop should appear together in the variable list. x1-10 means that the loop will start with the variable ‘x1’, continue to loop with every variable that appears in your variable list, and end with ‘x10’.
foreach var of varlist x1-x3 { reg y `var’ }You can even use a wildcard in case the variables you are looping over have the same prefix. Here, our prefix is simply ‘x’, so we can write:
foreach var of varlist x* { reg y `var’ }Any variable with the prefix you specify will be added to the loop.
Example 6 – Looping Over a Number List
Finally let’s also see how we can use the foreach loop to loop over a list of numbers. We saw that the forvalues command offers the same functionality but it is also possible to achieve the same results using foreach. In example 4, we used levelsof to get the year values, here we’re just typing the values as part of the loop.
foreach n of numlist 2019-2021{ reg y x1 x2 x if year==`n’ }