
Previous articles focused on exporting Stata results and output to excel using putexcel command. In this article, we are going to work on the putdocx command in Stata. This command helps you transfer data from Stata to an MS document file.
First, set your working directory by clicking on the file and then change the working directory.
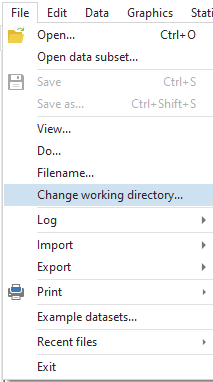
This is a crucial step because whichever file you would save, it would be shown in your working directory. You can find whichever working directory you have in the bottom left corner of the Stata window.
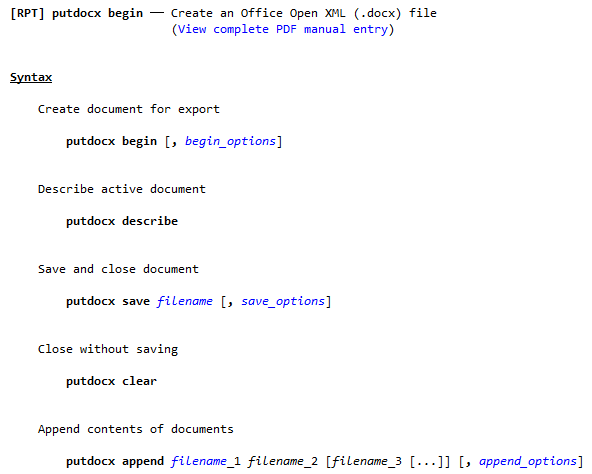
So, there are a couple of commands that start with Putdocx. For example, putdocx begin, putdocx save, putdocx paragraph, putdocx text, and putdocx image are a few commands you can work around. Although they are self-explanatory, we can explain some of these for you to grasp the concept. ‘Putdocx image’ can help you export images into an MS Word document, ‘Putdocx table’ helps you export a table to an MS Word document, etcetera. Any command starting with Putdocx would lead to an export of Stata results to an MS Word document.
Let us begin. We start with the Putdocx begin. It begins the document and does not create a document in the hard drive. It serves the purpose of creating an environment within Stata for us to send any data to MS Word documents. The first command is easy. Just put the following command in Stata
putdocx begin
This starts an MS file and does not do anything else. If you want to make it specific, for example, you want to set page size, or landscape margins your execution of the command would work as this putdocx begin, margin(left, 1) margin(right, 1) landscape.
We can have pretty much liberty to change the outlook of our export. For example, if you put help putdocx begin, it will provide you with all the different options that can work with the starting command.
Once you have started the document, let’s say you want to add some text. If you have to make some addition to the document, you would start with a paragraph. If you want to add some, you would give the following
putdocx paragraph
Remember, for MS Word, a paragraph does not necessarily contain multiple lines, it can make a paragraph whenever you press enter, and it jumps to the next line to start a new paragraph. So, in Stata we first set a paragraph, knowing that the text entered does not need to be multiple lines, it can be just a word or a few words. By setting a paragraph in Stata through the putdocx paragraph command, we would have a whole block where we can add all the text and material we want. We can change the style of paragraph and can change the paragraph to title by using the following command
putdocx paragraph, style(Title)
As it would be the first paragraph, Stata is instructed to add the style as Title. Next, you need to add following command to enter the text into paragraph
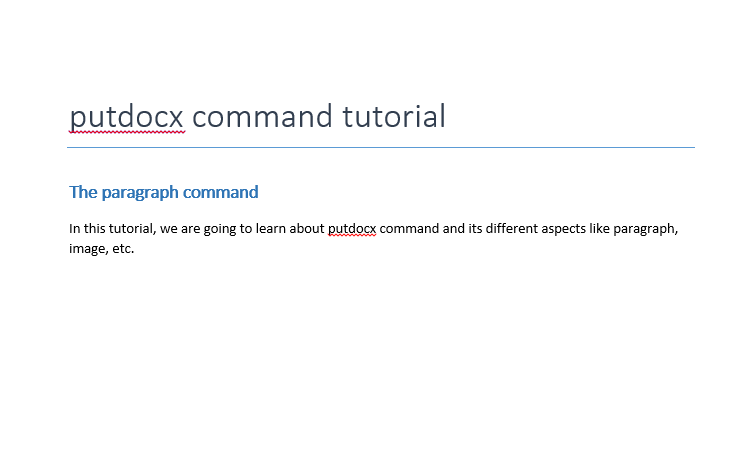
putdocx text ("putdocx command tutorial") This command basically helps you in putting the text in the Word document. The text added will be whatever text is present in inverted commas. In this case, text added is putdocx command tutorial.
When you execute the command, it would not create a document. Remember, the document would only be created when you save the document through the command putdocx save. We reserve this command till the last step so that we complete every command before it. If you want to add more text, you again want to add a putdocx paragraph as explained earlier.
The previous paragraph becomes a title, as we chose it to be the title paragraph. Now we move toward the heading of the document. For that, you have to put the style as heading1 in parentheses. You can add more headings as you move forward. Heading 1 is the first and top heading, while heading 2 will be the subheading, and so on and so forth. To add heading into word file, one should use the following command
putdocx paragraph, style(Heading1)
Remember, it is necessary to give a number to heading, or Stata will give an error sign. You can give the numbering to Headings as Heading1, 2 or 3 and so on.
After this command, you can further add the putdocx text command and repeat the previous step, i.e. adding the body of the text in parentheses and inverted commas by using following command
putdocx text ("The paragraph command")Now, if you want to make the body of the document, you can again add the command putdocx paragraph by using following command. As it is the body of the text, you need not add any style.
putdocx paragraph
After this command, repeat the process of putdocx text and then the required text in parentheses and inverted commas. For example, with additional text required to be added in Word file, your command would look like this,
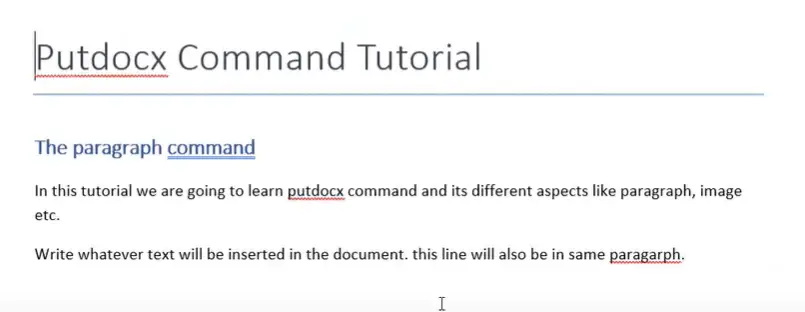
putdocx text (“ In this tutorial, we are going to learn about putdocx command”)
If you are planning on adding another line to the same paragraph, you can add the next command as such
putdocx text (“ and its different aspects like paragraph, image, etc.”)
Although it seems as if these commands would produce separate lines in the text, however, both of these commands would be executed in the same line in an MS Word document as they were part of the same paragraph command. If you want them to be on separate lines, you need to press enter on MS Word or change the paragraph in Stata.
To visualize this, we can save the file through the putdocx save command. You need to put the name of the file along with this command. For example, if your file is named report, you need to put the command as such
putdocx save report
If you want to replace a previously saved file, named report, just add replace to the command, and it would replace the file with the data from these commands.
putdocx save report, replace
Now, you have an MS document in your working directory, named Report, with all these paragraph commands you gave.
If you want to learn more, you can close the file and continue on the Stata again. Remember, your Stata can not save or make changes in a document while it is open, you need to close the document first to start working on Stata for it to take up commands.
Working with putdocx textblock in Stata
When you want to work on the document again, you need to put the following command
putdocx begin
Now, to make it a little interesting, let’s work on text blocks. You need to type following to start the command
putdocx textblock begin
Putdocx textblock is different from putdocx text. You might remember that you needed to have a paragraph container in putdocx text command but in putdocx text block, we do not.
You can write your desired text after your command putdocx textblock begin without any further command. After writing your desired text, you need to execute the putdocx textblock end command to conclude your text block. For example, to write further, we use the following command
putdocx textblock begin Write whatever text will be inserted in the document
This is quite an easy way of writing in a huge block of text. We do not need inverted commas or parenthesis or additional commands, the text would suffice. You can save this through a similar method of commanding ‘putdocx save report’. But what if we teach you another thing? Instead of replacing the document, let’s append it. You need to put the command as following
putdocx save report, append
This would add every change we have done to the previous file.
Saving Summary Statistics in MS Word Paragraph
What about some summary statistics? Let’s import some Auto data by using following command
sysuse auto.dta,clear
You know by now that auto data have different variables. For the sake of an example, let us run some descriptive statistics and add those statistics to our paragraphs. Open a new putdocx environment by using
putdocx begin
start a paragraph by putdocx paragraph and change the style to style(Heading1). The command will be as following
putdocx paragraph, style (Heading1)
Now to add text in the paragraph, use the following command
putdocx text ("Descriptive Statistics of Auto Data")This would produce a Heading with the title “Descriptive Statistics of Auto Data”. Now we are simply going to summarize our price variable, we can generate our mean, and Standard deviation of any variable using following command
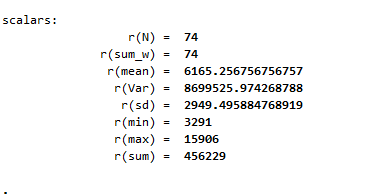
summarize
The above command will generate summary statistics of the data. If you want to know how Stata stores these values, then hop on to The Data Hall YouTube channel and find the video related to macros.
So, as we know that, we can use the written list command to access those variables. This number of observations is stored in r(n), the mean is stored in r(mean), and so on and so forth. This is Stata’s way of storing data from any statistics. Use the following command to access these variables use the following command
return list
Let us start a paragraph and add text. Within that text, we want to refer to these values. If you refer to the values within the text, they become dynamic and whenever someone would change the data set, these values would change by themselves within the text. So it would respond to whatever the value is stored in respective r(n) or r(mean) etcetera. Always remember to execute the commands, save the report and append the current changes made in Stata.
To start a paragraph, use the following command
putdocx paragraph
To write further text in the file, command will become as following
(“There are a total of ‘r(n)’ observations in our dataset, and the mean price of the car is ‘r(mean)’”)
File can be saved by using the following command
putdocx save report,append
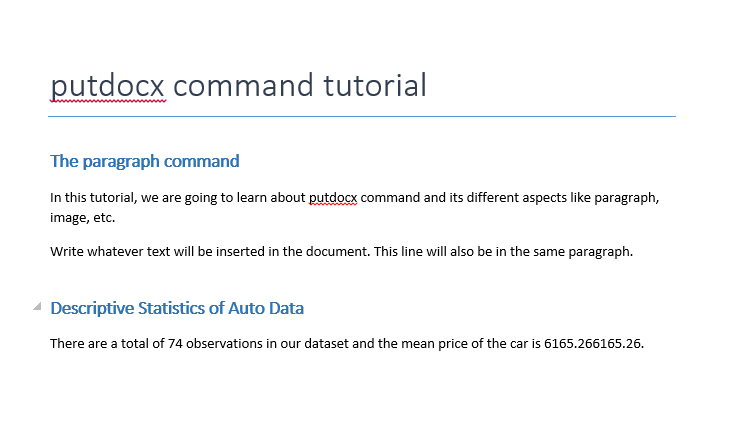
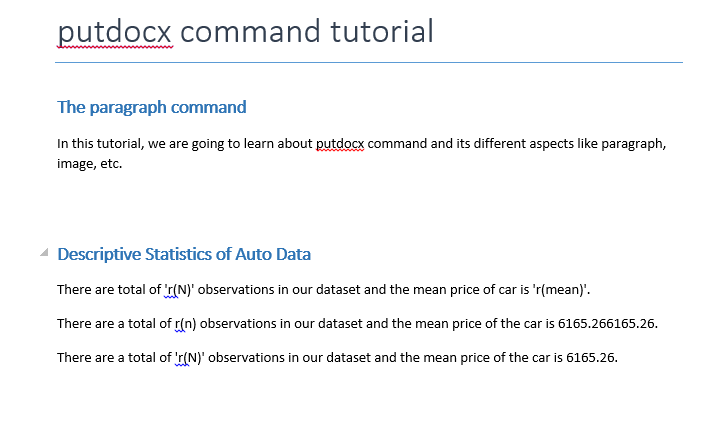
If you open the report, you would see the text with the corresponding data in the text. For example, if you wrote the command as : (“There are a total of ‘r(n)’ observations in our dataset and the mean price of the car is ‘r(mean)’”), your report will show the following data export: There are a total number of 74 observations in our dataset and the mean price of the car is 6165.2567567567567. Here, the values became dynamic with the variables. This is visualized as following
Now, if you want to restrict the mean value as it has a lot of decimal points, you can do that too! You would have to begin the document again, put in a paragraph, then put in a text, and then repeat the same text with a slight change. You know the commands for beginning the document and adding paragraphs will look something like this
putdocx begin putdocx paragraph
Now write this with the putdocx text command, “There are a total of r(n) observations in our dataset and the mean price of the car is”) using following command
putdocx text (“There are a total of r(n) observations in our dataset and the mean price of the car is”)
You can see that r(mean) is taken out of this text. You need to put r(mean) separately with another putdocx text command and change its format to up to two decimal points as such using following command
putdocx text (“ ‘r(mean)’”), nformat(%5.2f)
To add a full stop, you need to have its own line of putdocx text command. This can be done using following command
putdocx text (".")To change the numbering format, this step was necessary, as you cannot change it in the previous method of adding values to your text. Now your exported text would be something like this: There are a total number of 74 observations in our dataset and the mean price of the car is 6165.26.
Changing Format of the Word File
Moving forward, if you want to add page breaks or section breaks if you want to. They are interesting to work with because we can open a new page or a new section. Let us say we want to add a graph, and we want this graph on a new page. To begin with, we would use the following command
putdocx begin
To add a page break, use the following command
putdocx pagebreak
This will create a pagebreak in the file. Section breaks are a bit different from page breaks, they do have their own page numbering, style of page, etc. Page breaks simply result in a new page, nothing more, nothing less.
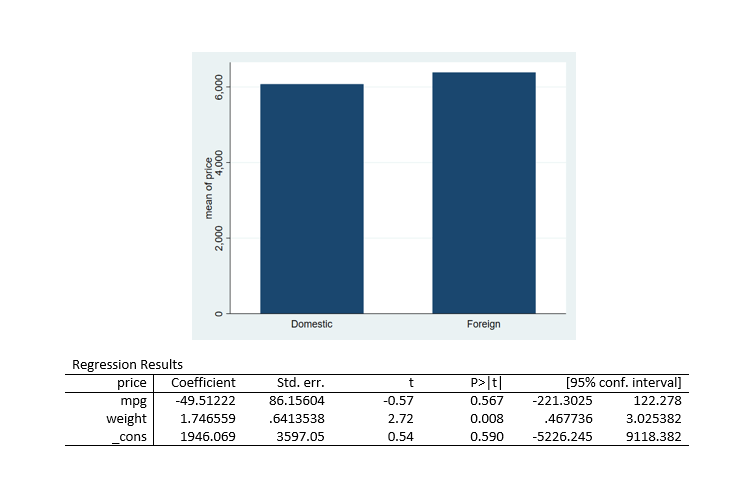
Now, if we want to create a bar chart of the mean prices of different types of cars, whether they are domestic or foreign. We use the following command to create a bar chart
graph bar (mean) price, over (foreign)
You have an image of the graph, if you want to export that image of the graph, you need to first save this graph. For saving the graph, use the command
graph export price.png
Here, price.png is the name of the graph you want to save. This would save the graph as a png or an image file. You need to save it first to later embed it into our MS Word Document.
Now add another paragraph with alignment in the center through the command
putdocx paragraph, halign(center)
Then you need to run the command for the image of the graph with its specific height and width as following
putdocx image price.png, width(4) height(3)
We have already saved the image in our working directory, and we will save all the amendments in the saved document by using following command
putdocx save report,append
Now, when you open your document, you’d see a new page with the graph image in the center with the specific width and height you wanted.
Let us move towards learning regressions on the putdocx command. You need to put the command to start working on it again.
putdocx begin
To run the regression, use the following command
regress price mpg weight
Now, let’s convert this regression results into table using following command
putdocx table regression= etable, title (“Regression Results”)
This command would take a table named regression and take the values from table E and give it the title of Regression Results. To save the results, use the following command
putdocx save report,append
When you save and append the table, you would see on your Report file that the data from Table E of regression were made into a table titled Regression Results, as shown below.
These commands are obviously quite detailed, you would need a little bit of practice to learn them well. So if you put the help putdocx table command, it can give you quite a lengthy help menu of its own. Other than these commands, you can also add a page number in the footer. For that, you will have to start with the following command
putdocx begin, footer(foot1)
This would begin a document and name the footer.
Your next command should be
putdocx paragraph, tofooter(foot1)
This would add a paragraph to the footer we just named above. To add text to the footer you will run the command of
putdocx text (“Page “)
and in the end you add the command
putdocx pagenumber
Now, you just need to save it as learned earlier. But what if you want to save in the new file because you can not append the page number into the already created file unless a different approach is used. So your saving command would be as following
putdocx save report3
Your working directory will show a new file which would be empty but would have page numbers showing in the footer.
Lastly, let’s teach you how to merge different Word files into one. With your files named Report 1, Report 2 and so on and so forth, you can combine them into one MS Word Document through another command. This command would be
putdocx append report1, report2, reort3, saving(allparts)
This would save all three in one file named allparts. Mind you, the previous reports would not be deleted, but a new file would be saved with data from all three mentioned above appended.