
Stata users should develop a habit of working in Stata do file rather than command box since this allows you to continuously save your code without the danger of losing hours of hard work. There are some important tips that help us enhance our experience when using do files, some of which we summarise below.
The do file should always start with the version command
This lets Stata know which version it should base its interpretation of your command on. If you wish for this to be version 13 of Stata, simply type:
version 13
Some commands (or their syntax) are specific to older versions of Stata and are not supported by newer versions. If you want to use a command from an older version, the version command will let you use it in a newer version. Your commands will then be executed as they would have been in the older version of Stata. This is especially a good idea in hindsight because you may want to execute an older do file months (or years) later with a new version of Stata but you may not remember which version of Stata you wrote that command in. A version command written at the start of the do file will make the execution of any code smooth regardless of which new Stata version you are running it on.
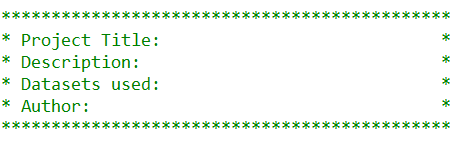
Add a Header
Always add a header to your do file to indicate what the do file’s purpose is. Specify a project title, its description and all the datasets used in the file. Also add a date and author name if it is to be used by multiple people.
Use Relative Paths in Stata Do file
To understand relative paths, let’s first understand absolute paths. Absolute paths are those paths that give the exact location of a file. For example:
use “E:\\Stata\Project1\data1.dta”, clear merge 1:1 symbol using “E:\\Stata\Project1\example\data2.dta”
The above code specifies the entire directory where datasets ‘data1.dta’ and ‘data2.dta’ are stored. If you share this do file with another co-author, or you decide to run it yourself on a different computer system, chances are these datasets will not be saved in the exact path you specified initially. For example, your co-author may not have the datasets saved in a folder called ‘Project1’ like you. The above commands will not run on their computer.
To get around this issue, we use relative paths that allow such command to run on any computer. There are two ways to use relative paths:
- Changing the working directory of the Stata file we are working on.
- Using global variables
- Changing the Working Directory
To change the working directory, we first specify the cd command before importing any dataset:
cd “E:\\Stata\Project1\”
This command changes our working directory to the folder ‘Project1’. We don’t have to specify this entire path when we import or merge data sets anymore. ‘data1.dta’ can simply be loaded by:
use “data1.dta”, clear
In case of datasets like ‘data2.dta’ which reside in a subfolder called ‘example’ within ‘Project1’, we only specify the subfolder’s name. The rest of the path has already been taken care of by the cd command. We can merge ‘data2.dta’ using:
merge 1:1 symbol using “example\data2.dta”
Using this method, any author of the do file will only need to change the cd command according whichever directory they have stored the relevant datasets in on their own respective computers.
- Using Global Variables
Global variables allow us to define variables in which we can store our directory path. For example, if we define a global variable called ‘path’ and store the aforementioned directory in it, our syntax would look like:
global path “E:\\Stata\Project1\”
Once we store the directory path in a global, we only need to refer to its name, in this case ‘path’, preceded by $ sign, when loading or merging datasets.
use “$path\data1.dta”, clear merge 1:1 symbol using “$path\example\data2.dta”
If someone wishes to change the directory, they only need to change the path specified in the global variable.
Stata doesn’t mind indentations or spaces
Stata code is not affected by spaces or indentations in the code. One should take advantage of this fact and make use of indentations to make code easier to read. For example, it is easier to identify which commands come within a loop in the following code because of good use of indentations:
forvalues i = 1/10 { display `i’ }Set More Off
Oftentimes our output data cannot fit in Stata’s Result window because of how long it is. Stata therefore pauses the execution of our commands and displays a “-more-” icon that needs to be clicked if we want to see the rest of the output. To tell Stata not to pause when displaying output i.e. not show a “-more-” option, we write the following command at the start of our do file:
set more off
This makes Stata display all the output at once, without the user having to press anything.
To ensure that this setting is remembered next time you open Stata, add a permanently option to the command above:
set more off, permanently
Finally, if you do want Stata to show a ”-more-” option when displaying long outputs in the Result window, simply use the command:
set more on
Master Do File
It is a smart idea to have one master do file and have all the other do files (if you must use more than one) nested within it. For example, we can nest five do files in one master do file using:
do “1.unziprawfiles.do” do “2.stockdata.do” do “3.sectordata.do” do “4.indexdata.do” do “5.announcements.do”
These five commands call on five other do files. Essentially, our master file executes five different do files. We can call upto 1000 do files from one master do file and have 64 levels of nesting. What this means is that each nested do file can in turn have another nested do file in it with upto 64 such nestings of do files allowed. “2.stockdata.do” being nested in a master file is a two-level nesting. If “2.stockdata.do” in turn has another nested do file in it, that would be three-level nesting.
Log Files
Log files store anything that appears in Stata’s Result window. This includes commands and their outputs. If you were to run a regression, both the regression command and the output table will appear in the log file. To start recording a ‘log’ of your work, type in:
log using “example.smcl”
This command opens a log file and records the commands we execute and their outputs. The command above writes the log file in SMCL (Stata Markup and Control Language) format. If we wrote an extension of “example.log”, Stata would write the log in text format.
Stand Alone Do Files
Stand alone do files are able to execute entirely without any human intervention. This means that a do file may be able to load a dataset, execute a set of commands on it, and then save the output; all within a single execution.
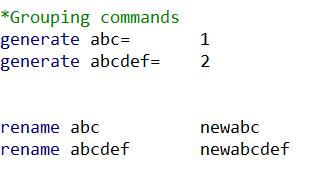
Grouping Commands
Commands of a similar nature should be grouped together. This improves the readability of the do file. For example, when generating a number of variables, one should group these commands together. Similarly, commands that rename variables should also be grouped together.
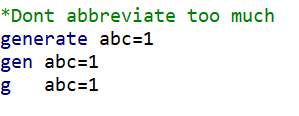
Don’t Abbreviate Too Much
While abbreviating commands make our code concise and quick to write, we shouldn’t go overboard with abbreviations. The command used to create new variables called generate can be abbreviated as gen or g. Very short abbreviations like g often make it hard for others to understand what the function of a code is; while gen would be more comprehensible and concise at the same time.
Different File Names for Input and Output Data Files
Input and output data files should be saved with different names. This is crucial in ensuring that our initial data file remains present in its original form. Any changes made to it after data cleaning or formatting should be saved as a new, differently named data file. It is very likely that you (or a coauthor) would need the original data file again, in which case it would come in handy to have it saved without any changes made to it.
Closing the Log File
When we execute a do file, they keep running until they encounter an error in executing the code. When this occurs, the do file stops running and any code beyond the error point remains unexecuted. One such error occurs when we are closing a log file.
We close/end a log file through the command:
log close
However, this results in an error when our log file is not open or we have mistakenly closed it. To get around this error, we precede the above command with capture:
capture: log close
The capture prefix suppresses any errors that may occur during the execution of our do file, and will allow it to continue executing despite any errors. If there are other commands where we might require the use of capture, we can encapsulate it in the capture command like:
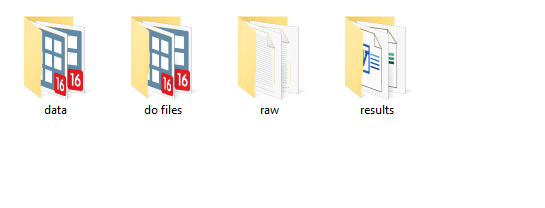
capture { }Organising Your Files
It is strongly recommended that you save your data files and do files in their respective subfolders that are stored in one main folder. You may also make a separate sub folder for your outputs, graphs and log files.
Numbering the Do Files
If your project involves working with multiple do files, it is a good idea to add a number in their names to reflect the sequence in which they need to be executed. For example, if a do file generates new data files, which in turn need to be loaded into a second do file, it would help to add a ‘1’ to the first file, and a ‘2’ to the name of the second do file to indicate the order of their execution.
Another takeaway from this tip is the advantage of having multiple do files for one project. If there are several sections of related but separate codes in your project, divide them into different do files. It brings ease into the process of debugging and reading code.
Adding Comments to Your Do File
The importance of commenting each part of your code cannot be stressed enough. It is not an exaggeration to suggest that your do file should have more comments than code in it. Commenting adds value to your do file by saving you (and your coauthors) the time that it would otherwise take to make sense of the sequence and purpose of any piece of code written in it.
When commenting, maintain a consistent format. For example, you may use asterisks (*) for headings, and a double forward slash (//) for descriptive comments. You can comment out multiple lines of text as follows
/* Line1 Line2 Line3 */
Consistency in Naming Variables and Labels
Always use a consistent style when naming variables and their labels. This is discussed in more depth in another article. For example, all log variables should start with an ‘ln_’ prefix, and all standardized variables could start with an ‘std_’ prefix.
You do not have to label every single variable at the start of your project. This is only required for variables you will be outputting summary statistics for or those that you will be using in your regressions or other analysis.
Quietly Use ‘Quietly’
Prefixing a command with quietly allows us to run a command without generating any output in Stata’s Result window. This is also helpful when we don’t want an output displayed in the log file. For example when we want to run a loops that runs hundreds of regressions and stores the coefficient from each one of them in a new variable. We may not want the hundreds of regressions to be output in the log file since the loop’s purpose is only to populate another variable with their coefficients. In such a case, we may carry out the regressions ‘quietly’:
quietly regress var1 var2
The above command would carry out the regressions but without displaying the regression table.