
Merge command in Stata serves the purpose of merging data or combining different datasets. Within the Merge command, there are several merge types, including one to one merge, many to one merge, one to many merge, and many to many merge, each with its unique applications. In their respective sections, we will explore these merge types and the options available for merging data effectively.
One-to-One Merge
Download Example FileIn a one to one merge, each row of data in the master file corresponds to a unique row of data in the using file. Let us imagine we have the following sets of data in our working directory,

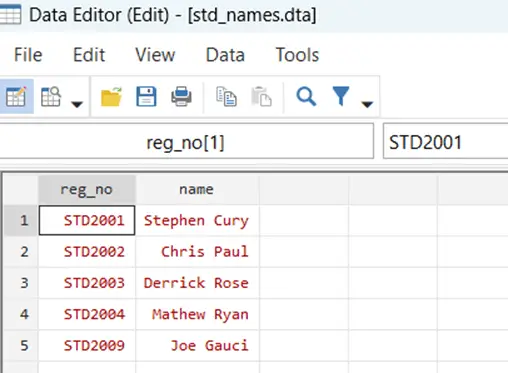
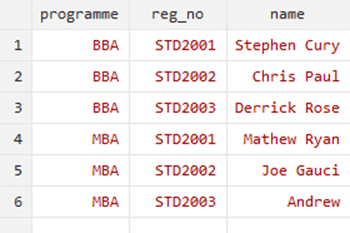
Upon examining the data, we can see that all these datasets have names, registration numbers, and additional details of students. Let us demonstrate a simple one-to-one merge using these student data. One of our chosen file has Student’s names and registration numbers, as shown below,
while the other has Student’s registration numbers, age, project marks and final marks.

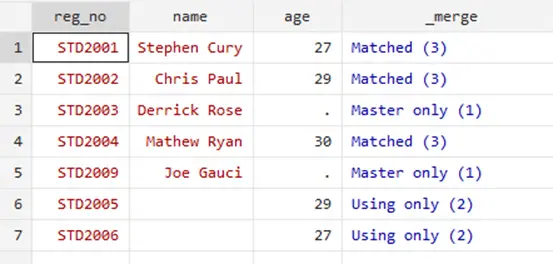
These registration numbers correspond to a row of data, relevant to one specific student. This means that the registration numbers are unique and not duplicated. Our objective here is to merge this data into corresponding sections within student’s name dataset. Specifically, we aim to include the age, project marks, and final marks for students like Stephen Curry and Chris Paul in the respective spaces. In cases where there are no details available, such as for Derrick, it results in missing data. For students like Matthew, we do possess data, but for students like Joe, we lack relevant information. Furthermore, for the registration numbers of STD2005 and STD2006, we lack the names. In these instances, we tend to insert the registration number in one place and the relevant data in another. However, we would not have access to their names. Keeping these considerations in mind, we can move forward with our command.
We need to start with introducing the first data file to Stata through the command,
use std_names.dta
Our command for the above explained one on one merge will be,
merge 1:1 reg_no using std_details.dta
Here, the “master file” and “using file” are two critical components to understand while working with the Merge command in Stata. The master file is the primary dataset or file that is currently open and residing in the Stata memory. It serves as the foundation or base dataset to which data from the using file will be incorporated or merged. Whereas, the using file is the secondary dataset that you want to incorporate into the master file. It contains additional data or variables that you intend to merge with the master file to enrich or modify the existing dataset. The using file is essentially the source of the data that will be merged into the master file.
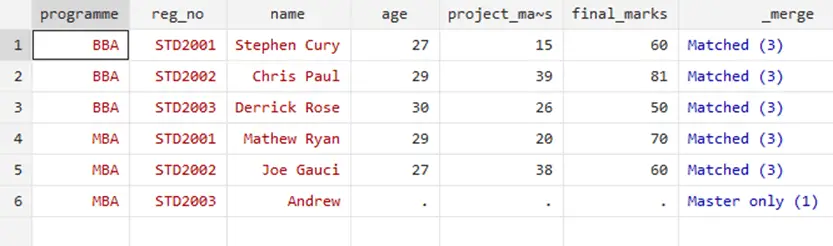
So, this command develops a ratio between the master file and the using file as 1:1, i.e, one on one merge. Alongside, it highlights the key variable, the registration number, that is common between master and using file. The information on your results also needs to be explained a little.
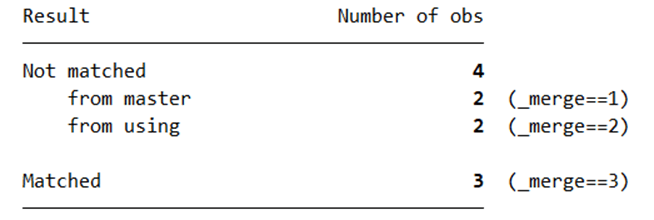
The summary above shows that three individuals had their data merged, whereas four were not merged because they did not match. Two were not merged from the master file while two were not merged from the using file. Using your Data Editor, you can visualize your merged data as such,
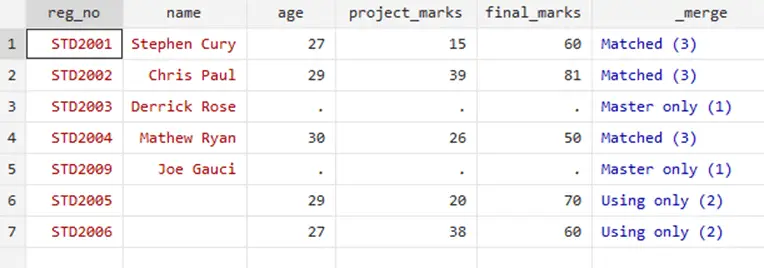
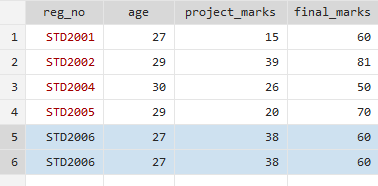
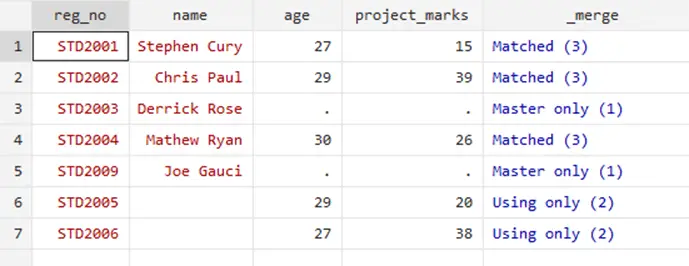
Our data viewer also highlights how different numbers correlate with different merges. If the data is only available in the master file, it is represented by “Master only (1)”. If only available in using file it is represented by 2 and if the data is available in both the using and master file then its numbered as 3. So, if you just want to keep the matched data, the variable corresponding to it is merge=3. Knowing this, you can easily use this command,
keep if _merge==3
to get this result

Your data in the Data viewer would be shown as such,

Handling Errors
Sometimes, you may encounter errors during merging, for example using a wrong merging type or having duplication in data. In this section, we will discuss the possible reasons for such errors and how to address them.
Let us assume that we have a file titled ‘std_details_error.dta’. Additionally, we want to merge this file with our master file ‘std_names.dta’. As we have done this simple merging already, we will be going through these commands,
use std_names.dta merge 1:1 reg_no using std_details_error.dta
However, we get this error.

The error clearly states that the registration number variable does not uniquely identify observations in the using data. To understand this let us open the ‘std_details_error.dta’ file.
When opened through Stata, one can observe that there is a duplication in our dataset; there are two repeated rows for a single registration number. Thus, you need to determine and delete the duplication in your original dataset to move forward with merging.
Merge with Multiple Key Variables
In situations where a single key variable isn’t sufficient to uniquely identify records, we can perform a merge using multiple key variables. Let us illustrate this with an example involving program and registration numbers. Our dataset ‘std_names_multiple.dta’ has repeated registration numbers corresponding to their programmes, as it can be seen in the illustration below,
The students cannot be identified on the basis of registration numbers alone. Thus, our key variables are both the program and the registration numbers. Let us go through the master file,
use std_names_multiple.dta
Our merging command will include both of these previously discussed variables as such,
merge 1:1 programme reg_no using std_details_multiple.dta
Your nicely merged data will show up like this,
Many-to-One Merge
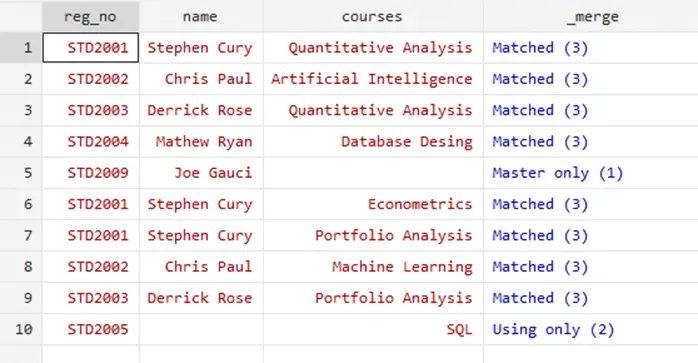
A many to one merge is needed when there are multiple instances of a key variable in the master file and only one in the using file. We’ll explore this scenario and show how to merge data accordingly. Let us see the master file for this example; ‘student_courses.dta’ file where registration numbers and the courses registered constitute the file.
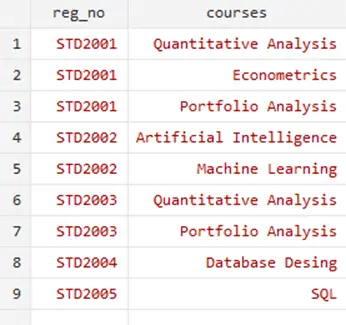
Upon closer examination, you can observe that one student may have registered two or more courses that result in repetition of the registration numbers. Knowing this, we can not perform the one to one merge with this command,
merge 1:1 reg_no using std_names.dta
because we will get this error,

This means that we have used a wrong merge type. Our corrected command would be,
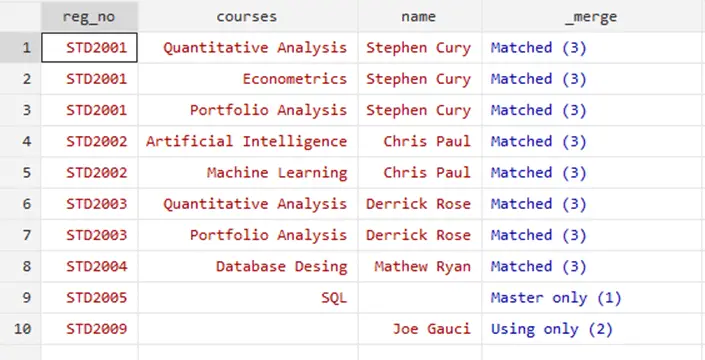
merge m:1 reg_no using std_names.dta
Here ‘m’ relates to ‘many’ instances of our key variable in the master file. Your data will look like this after merging,
One-to-Many Merge
Conversely, a one to many merge involves a single instance of the key variable in the master file and multiple instances in the using file. We will demonstrate how to execute a one to many merge through the master file, ‘std_names.dta’ with the commands,
use std_names.dta merge 1:m reg_no using std_courses.dta
Your data will look like this,
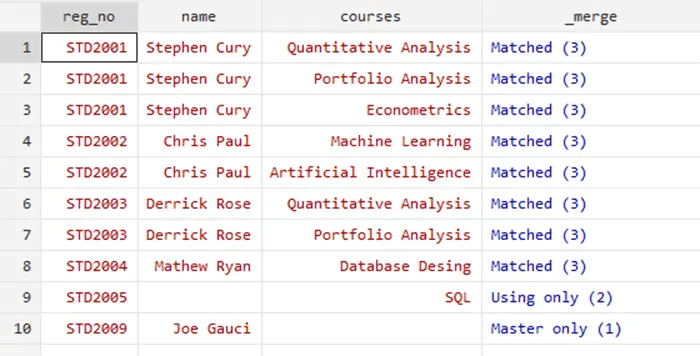
If you feel the need to sort the variable, you can use the following command,
sort reg_no
and your data will look like this,
Many-to-Many Merge:
A many to many merge can create multiple records in both the master and using datasets can match with one another. In other words, each record in the master dataset can potentially match with multiple records in the using dataset, and vice versa. This type of merge can lead to a more complex merging scenario compared to other merges.
It is very important to note that these merges can result in larger merged datasets with repeated information, as multiple matches can exist for each record in both the master and using datasets.
The command for many to many merge does not differ from the others, except you got to use m:m ratio for the merging.
Options for Customizing Merges
Stata provides various options to customize merges to suit your specific needs. In this section we will cover options such as “nogenerate,” “noreport,” “nolabel,” and “generate” to control the merging process and the resulting variables.
In multiple files merging, the merge variable that is generated after merging does not appeal much. To drop this variable, you can start by working on a master file through,
use std_names.dta
and continue your merging with this small customization in the command,
merge 1:1 reg_no using std_details.dta,nogenerate
Your merge variable will be dropped as such,
To suppress summary statistics we can use this command,
merge 1:1 reg_no using std_details.dta,noreport
and to suppress the value labels or the value variable labels, we can use,
merge 1:1 reg_no using std_details.dta,nolabel
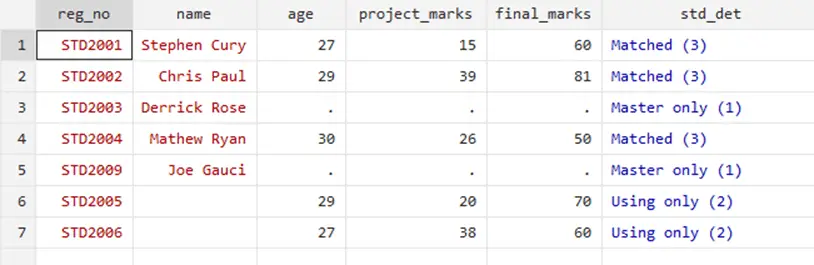
By default, the merge variable will be named as such. However, if you want to specify the name of the ‘merge’ variable, the generate option comes in handy. After specifying the master file through
use std_names.dta
we can use the generate option to customize the name of our variable,
merge 1:1 reg_no using std_details.dta, generate(std_det)
As you can see below, the name has been changed.
Selective Variable Merging
You can choose to merge specific variables from the using file into the master file. We will have to use the “keepusing” option to demonstrate how to merge only the desired variables. For the sake of example, in our master file that is opened through the command,
use std_names.dta
we only need to merge the ‘age’ from the using file, we can use the command,
merge 1:1 reg_no using std_details.dta, keepusing(age)
Your Stata will merge the age variable as such,
You can use multiple variables too. For example, the command,
merge 1:1 reg_no using std_details.dta, keepusing(age project_marks)
will show these results,
Refining Merging with the”keep” Option:
Learn how to further refine your merge by using the “keep” option with parameters like “match” and “master” to retain only the matched or master-only values. After opening the master file through,
use std_names.dta
You can customize the merging through some of these examples,
merge 1:1 reg_no using std_details.dta, keep(match)
This command will only merge the matched values, i.e.,

Another command,
merge 1:1 reg_no using std_details.dta, keep(master)
will only keep the values that were in the master file, i.e,

We can use both of these options in one command too!
merge 1:1 reg_no using std_details.dta, keep(match master)
will show results as such,
Your data will correspond to your keep commands.
Merge Update
In cases where you have updates to your data, we will explore the “update” option, which allows you to incorporate changes from an updated file into your current dataset. We will also discuss handling conflicts during the update process.
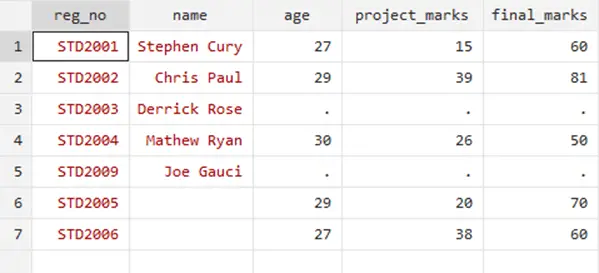
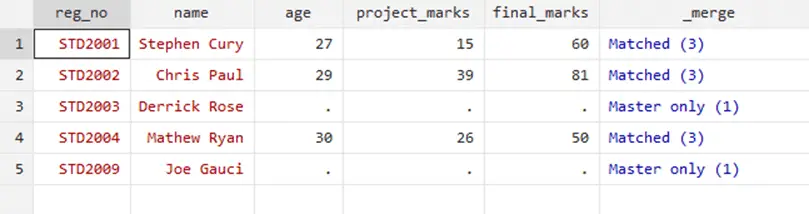
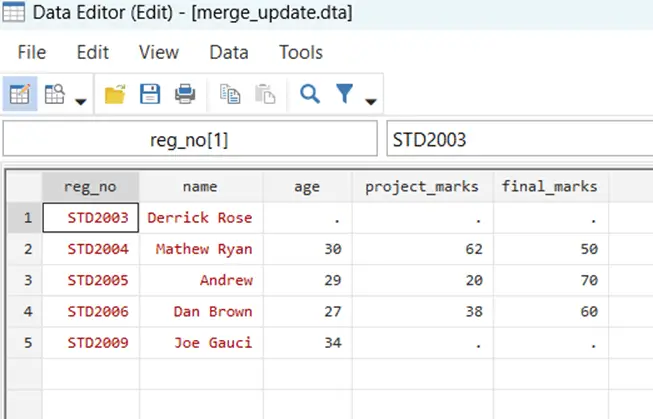
Let us assume that we use the master file ‘full_data.dta’ through the command,
use full_data.dta,clear
By comparing the files of full_data.dta and the merge_update.dta, we can clearly see that there are certain updates in the latter file. The missing names for the registration numbers are added and the project marks of Mathew Ryan are increased from 26 to 62.
A simple merging through the command,
merge 1:1 reg_no using merge_update.dta
will show you these results,
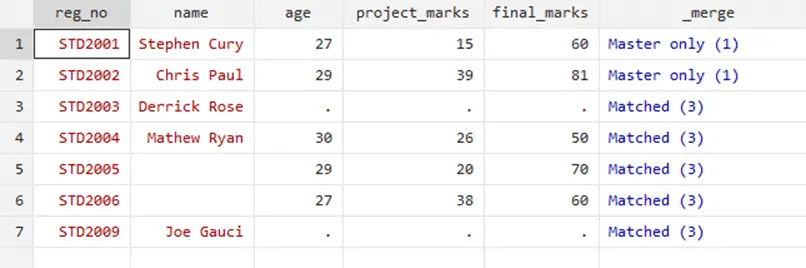
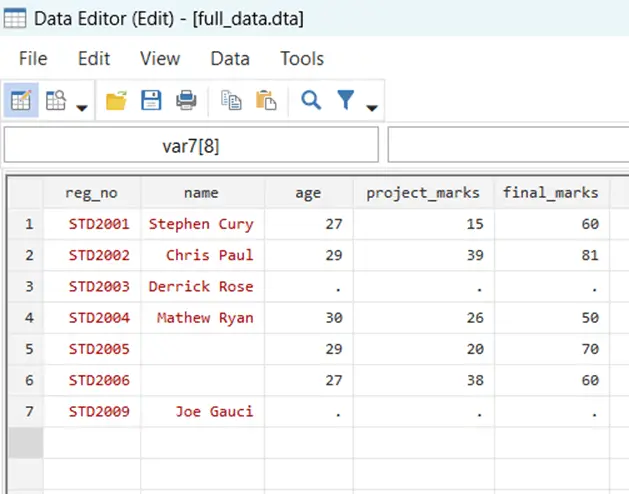
If you observe closely, this merging retained our previous data and is incorrect as it is not in line with the updates.
Here, if one uses the update option in the command instead of the simple merging command as such,
merge 1:1 reg_no using merge_update.dta,update
your data will be at par with the new updates in your data,
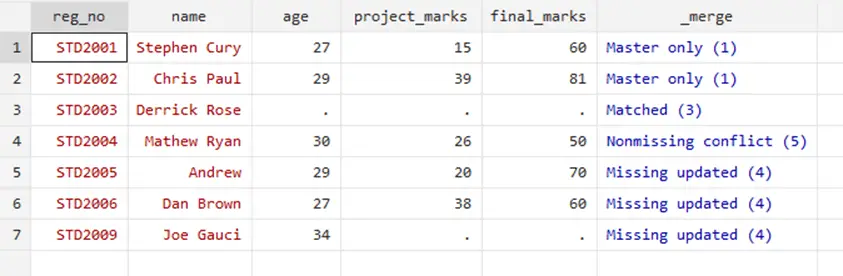
Through the merge variable, you can see that the three rows where the update took place. This option filled the missing values for relevant students. However, the ‘Nonmissing conflict’ suggests and warns that there was a conflict that has not been resolved, i.e, the updated marks of Mathew Ryan were not included in this update as it would require a replacement to the previous marks.
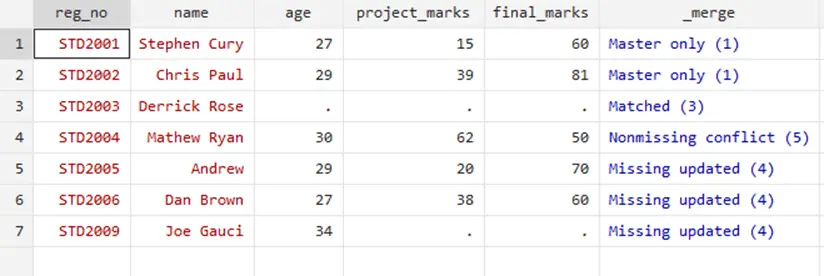
Replacing Conflicting Data
To resolve conflicts during an update, you need to use the “replace” option along with the “update” option, ensuring that conflicting values are updated as well. Thus, your command will be
merge 1:1 reg_no using merge_update.dta, update replace
and your updated data set will be ready with the replaced values,
Keep practicing and you will soon have a comprehensive understanding of the Merge command in Stata, along with the skills to merge and update datasets effectively while optimizing your workflow.
Happy Learning!