
We will be discussing how to create log files in Stata, exploring various options for log file formats. Log files are useful for capturing and saving the output in a text format, that appears in the Stata output window. There are different ways to initiate and manage log files, and we’ll cover these methods step by step.
To begin, we can create a log file by either using the menu or writing code. To access the menu option, we need to go to File, click on the log option and click on Begin. We can pause and resume logs through this menu too. While the menu option is available, it’s generally more practical to utilize code for consistency, especially when working with do files. To start a log, use the “log” command followed by “using” and specify the desired file name. The command should look something like this,
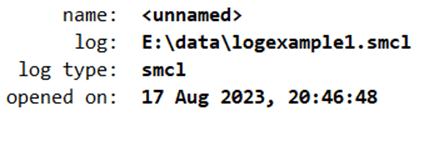
log using logexample1
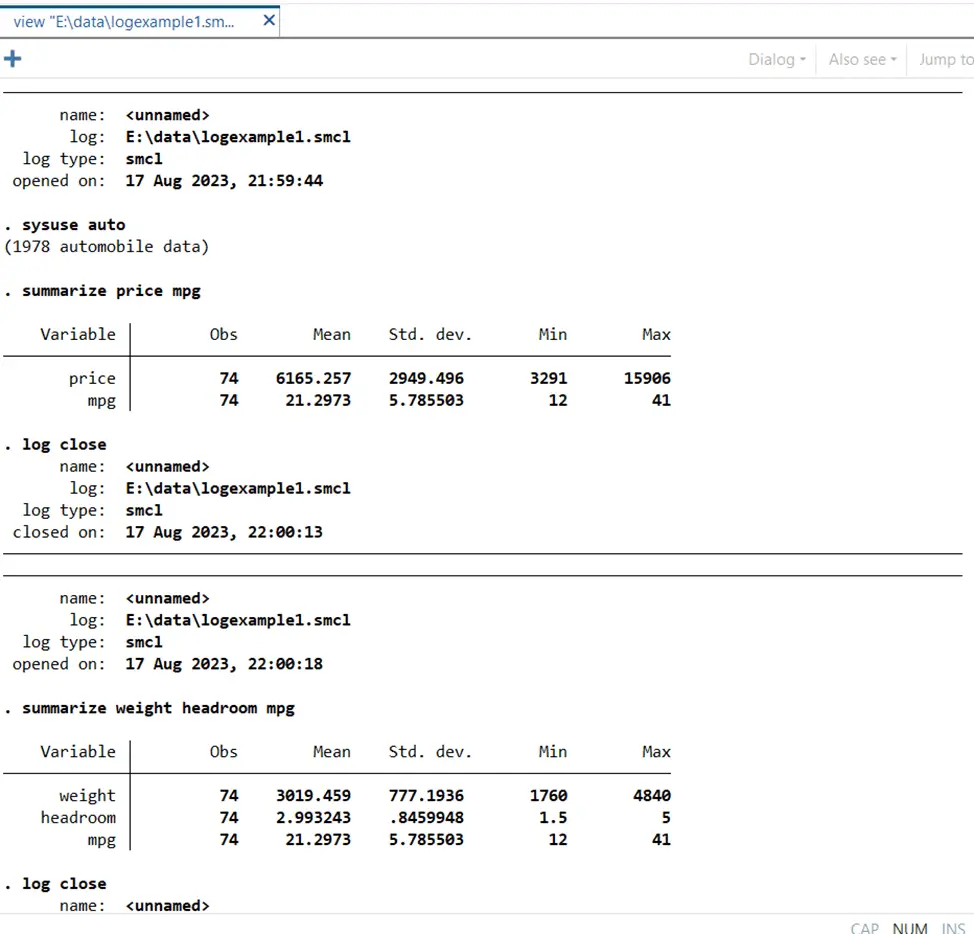
This syntax will save the log of the data on the output window in a designated file, which in this specific example would be called “logexample1”. The output window would indicate that the log has been initiated along with the name of the log, its location where it is saved on your device, its date, time and type.
The log will capture all content displayed in the output window, including input, output, commands, and potential errors. This information provides a record of the session’s progress.
To demonstrate what a log file would look like let’s create one. Let’s import some data from the system. You can always import data from the following command,
sysuse auto
It can help with built in data that is good for practice. Let us summarize the variables of price, weight and mileage from our data. Our command
summarize price mpg weight
would generate the following data

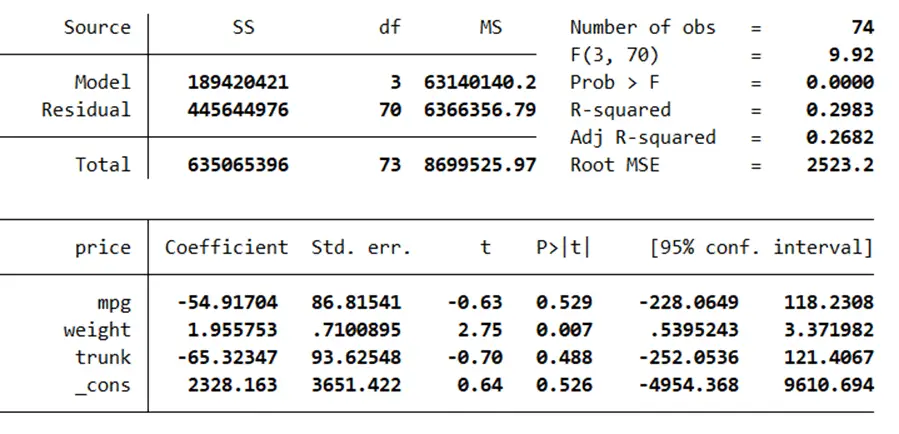
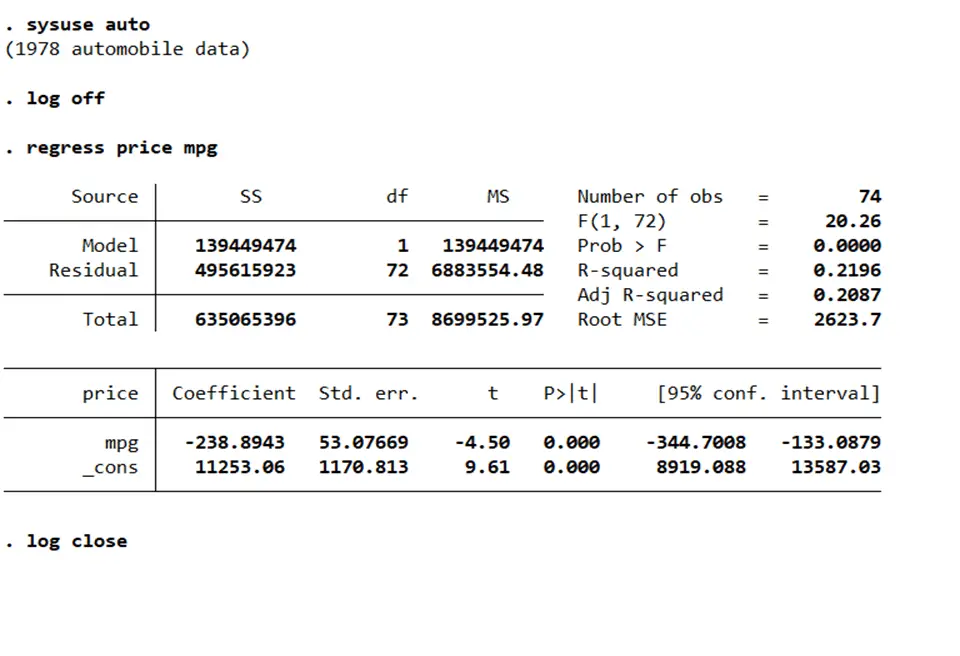
Let us suppose that we also want to regress a few variables too. Our command for regressing the variables should be,
Regress price mpg weight trunk
Your output window would show the regression as such.
What if we also want to drop certain variables? Our command drop if price>10000 would generate as such

Suppose this was all we wanted to work on, we can use the command
log close
to save all of this log file in our device. This log can be accessed through stata as well. You will need to find it through the log menu we accessed before and by clicking view. You can add the file address and it will show your saved log file in this format,

Let us imagine a situation that you really like the name “logexample1” and want to create another log file with the same name. Stata does not approve of this, though. Whenever you will attempt to do so, the output window will remind you that the logexample1 file already exists. What you can do is, you can replace the previous log file with a new one through a simple command. To replace the previous one and starting a new one with the same name, use the command
Log using logexample1,replace
You can repeat all the previous actions for this log file now.
Let us march forward and learn the process of appending logs. If you wish to add more operations to an existing log rather than replacing it, the
log using append
command can be used. This command will reopen your previously closed log file, making it readily available to document some new work to be done. Your log file would look something like this,
This is particularly useful when you want to document different sessions over different times of the day, week, month or year.
Remember, it’s important to close an existing log before opening another one. Use the
log close
command to achieve this.
Logs can be saved in different formats, such as smcl or text. The smcl format is compatible with Stata, whereas the text format, with its extension “.log”, can be more accessible for your co-authors who might not have Stata installed. To save a log in text format, add the “text” option to the log command:
log using logtext, text
Your log file in text format would appear to the viewer as such

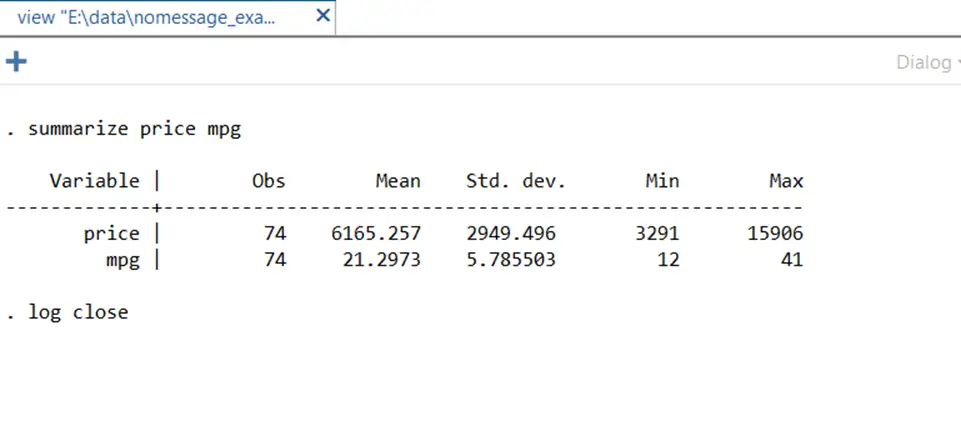
Additionally, there’s the “no message” (nomsg) command, which excludes the default log messages that typically appear at the beginning and end of logs. This can result in a cleaner log output. To demonstrate, let’s create a log with and without these messages:
log using nomessage_example,text nomsg
Your cleaner log file will show up like this
You can also temporarily pause or resume logging using the “log off” and “log on” commands. This can be handy when you want to exclude specific commands from being recorded in the log temporarily.
Although we performed several commands while the log was off, it would not appear till the log is turned back on through the log on command.
In summary, log files are a valuable tool for documenting and trailing your work in Stata. They capture the output and commands executed during your session, providing a comprehensive record of your analysis. By understanding these steps and working with the available options, you can easily and effectively create, manage, and utilize log files in your Stata projects.