
We are going to look into how to change the working directory or your working folder in Stata. First, we need to understand what a working directory or a working folder is. For defining purposes, it is the current folder where our data files, do files, and example files are present. It is the directory or folder that we are currently working on with respect to our specific project.
Download Example FileTo set up a working directory we use cd command as follows
cd "E:\Change working directory in Stata\data"
In the above command “cd” stands for change directory. We use the cd command followed by the path to our working directory. Remember to close the path in inverted commas. Now, once we have set the working directory, we do not have to specify full path each time we import a data, save or say merge the data. Let’s just say we share this do file with someone, some of our contributors or colleague or our co-research worker, so they only have to change the path in cd command instead of changing path to each command related to import or merging of the data.
We can always check whatever our current folder directory is by using the cd command. You do not need to specify any path, you just use the command
cd
and it will tell you what our current working directory is; within that folder, we have changed working directory folder and within that folder we have our “data folder” and this data folder becomes our working directory.

We can also use the pwd command for same purpose, but I guess there is no need to remember a separate command for that when we have the cd command.
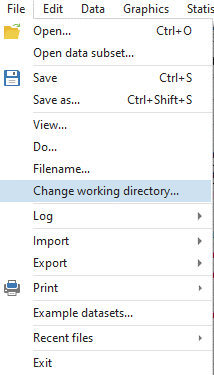
Change Working directory through Menus
We can also change working directory from menus. For that we just have to click on file and then there is an option called “change working directory”.
Levelling up, for the sake of example, let us say we somehow set this level 5 as working directory. Through our command
cd “E: \Change working directory in Stata\data\level2\level3\level4\level5”
We can specify our working directory as this last folder. Now, if we wanted to move one level down or a level up, for example to access some files on level 4 on our current working directory, we have a way. What we need to do is instead of specifying the whole path as a level 4, we can just change the working directory by specifying through our command
cd ..
and this would change the working directory to level four. Similarly, the command
cd ../..
would drop it two levels i.e. to level 2 from level 4.
The command
cd ../../..
Similarly, the above command would drop it by three levels.
We can also move one level up, for that, we can have a relative folder path. For example, let’s assume that we have specified the main data folder as our working directory. However, let us just say that there are certain files that we need to access from level 3 so instead of specifying this whole path we can just go two levels up. To achieve that purpose, we can specify our command like
cd level2\level3
Here, we are using relative path instead of specifying the full absolute path. So, we do not have to specify level two or three, we have to insert the name of the folder in our command. As the Level 3 data file is easily accessible, it would not create any problem.
Additionally, we can list all the files in our folder too using dir command
dir
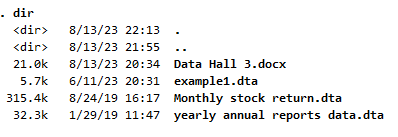
or we can have them displayed in wide format using wide option.
dir, wide

We can also specify if we want to look at the list of files with a specific file extension
dir *.dta
The asterisk in the command is a wild card so it does not matter what the name of the file is but it should be a .dta file.
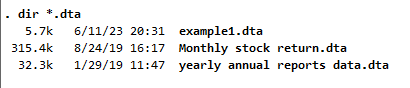
As in our specified case, we have two data files so it should display all the dta files. Subsequently, we can also display all the files that start with the name “example” through a simple command
dir example*
It would display the files called “example do file” and the “example data file”. Thus, wild cards can enormously help in such situations. Happy learning!